Mapping Data in the Mapping Canvas
Mappings · Updated June 24, 2025
Before You Get Started
Before you begin mapping data, make sure you have completed the following actions:
- Review the Navigating the Mappings Page in Reactor article to learn about all the features of the Mappings page and the Using the Semantic Layer in Reactor to learn how to use the Semantic Layer in Reactor's Mappings interface to transform source data to destination schemas
- Connect all data sources needed for your mapping exercise (for more details, see: Connect to a Data Source)
-
Standardize data for your connected data sources (for more details, see: Standardize Your Source Data)
-
(Optional) If multiple data sources need to be linked so that you can join data between the sources, configure source links (for more details, see: Source Links)
Mapping Data
How to Create a Model Configuration
To create a new mapping configuration:
-
Select the ➕ icon at the top of the mapping graph next to the Models header to begin the setup wizard
-
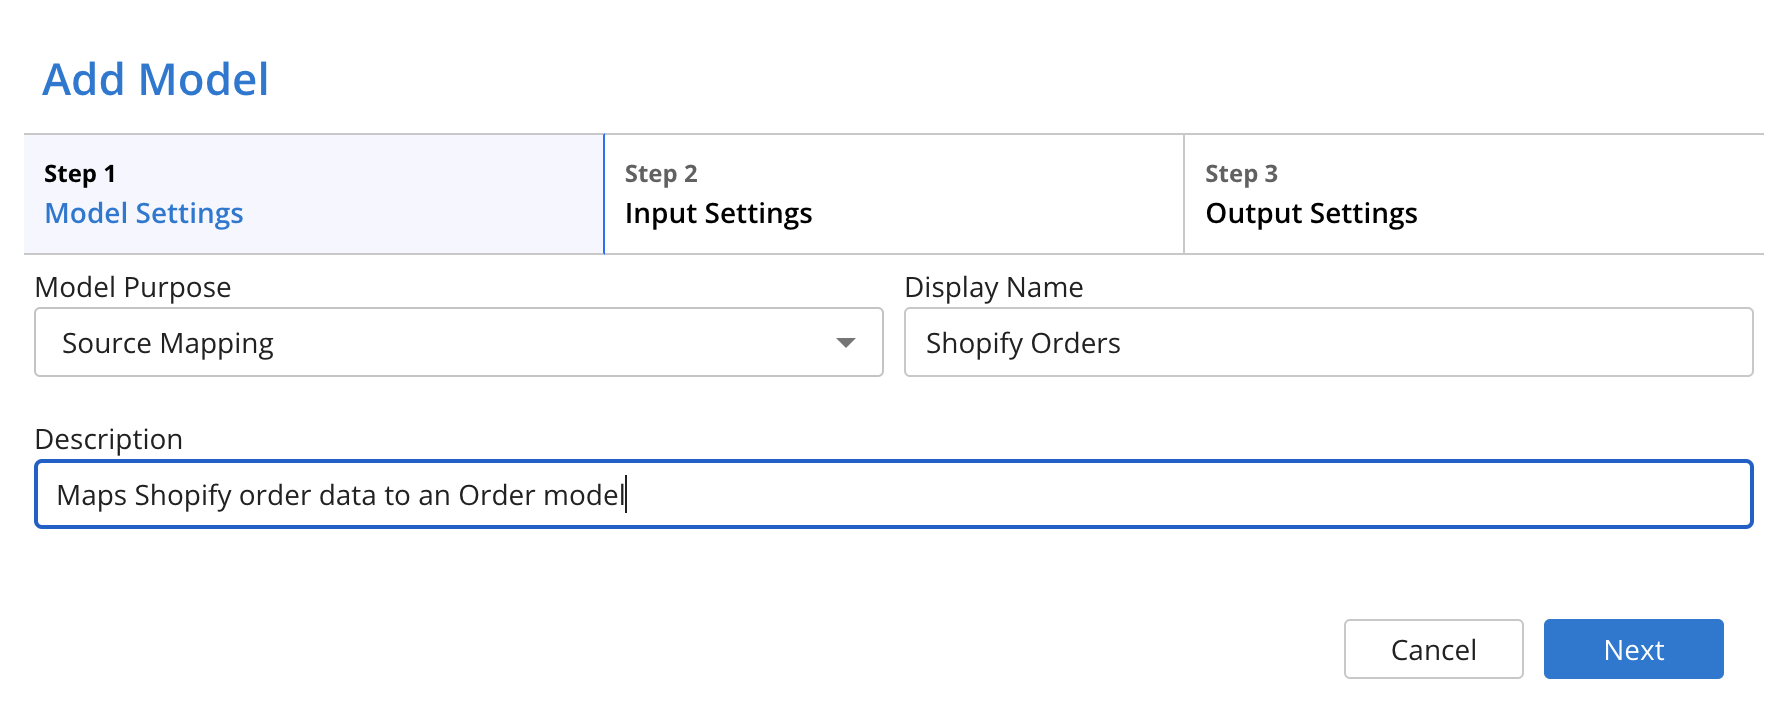
Define the model's settings in the first screen of the setup wizard:
-
Model Purpose: Select the type of model configuration to create, one of the following:
- Source Mapping if you want to map data from a data source (one of the white boxes on the mapping graph)
- Select Model Mappingif you want to map data from a mapping configuration (one of the white boxes on the mapping graph)
-
Display Name: Enter an alias, or display name, for your mapping configuration.
- Select Next to proceed. This alias will be displayed in the model configuration box on the mapping graph.
-
Description: Provide a summary of the model that other users can reference.
- Select Next to move to the next screen of the setup wizard and define the model's input settings:
- Select Next to move to the next screen of the setup wizard and define the model's input settings:
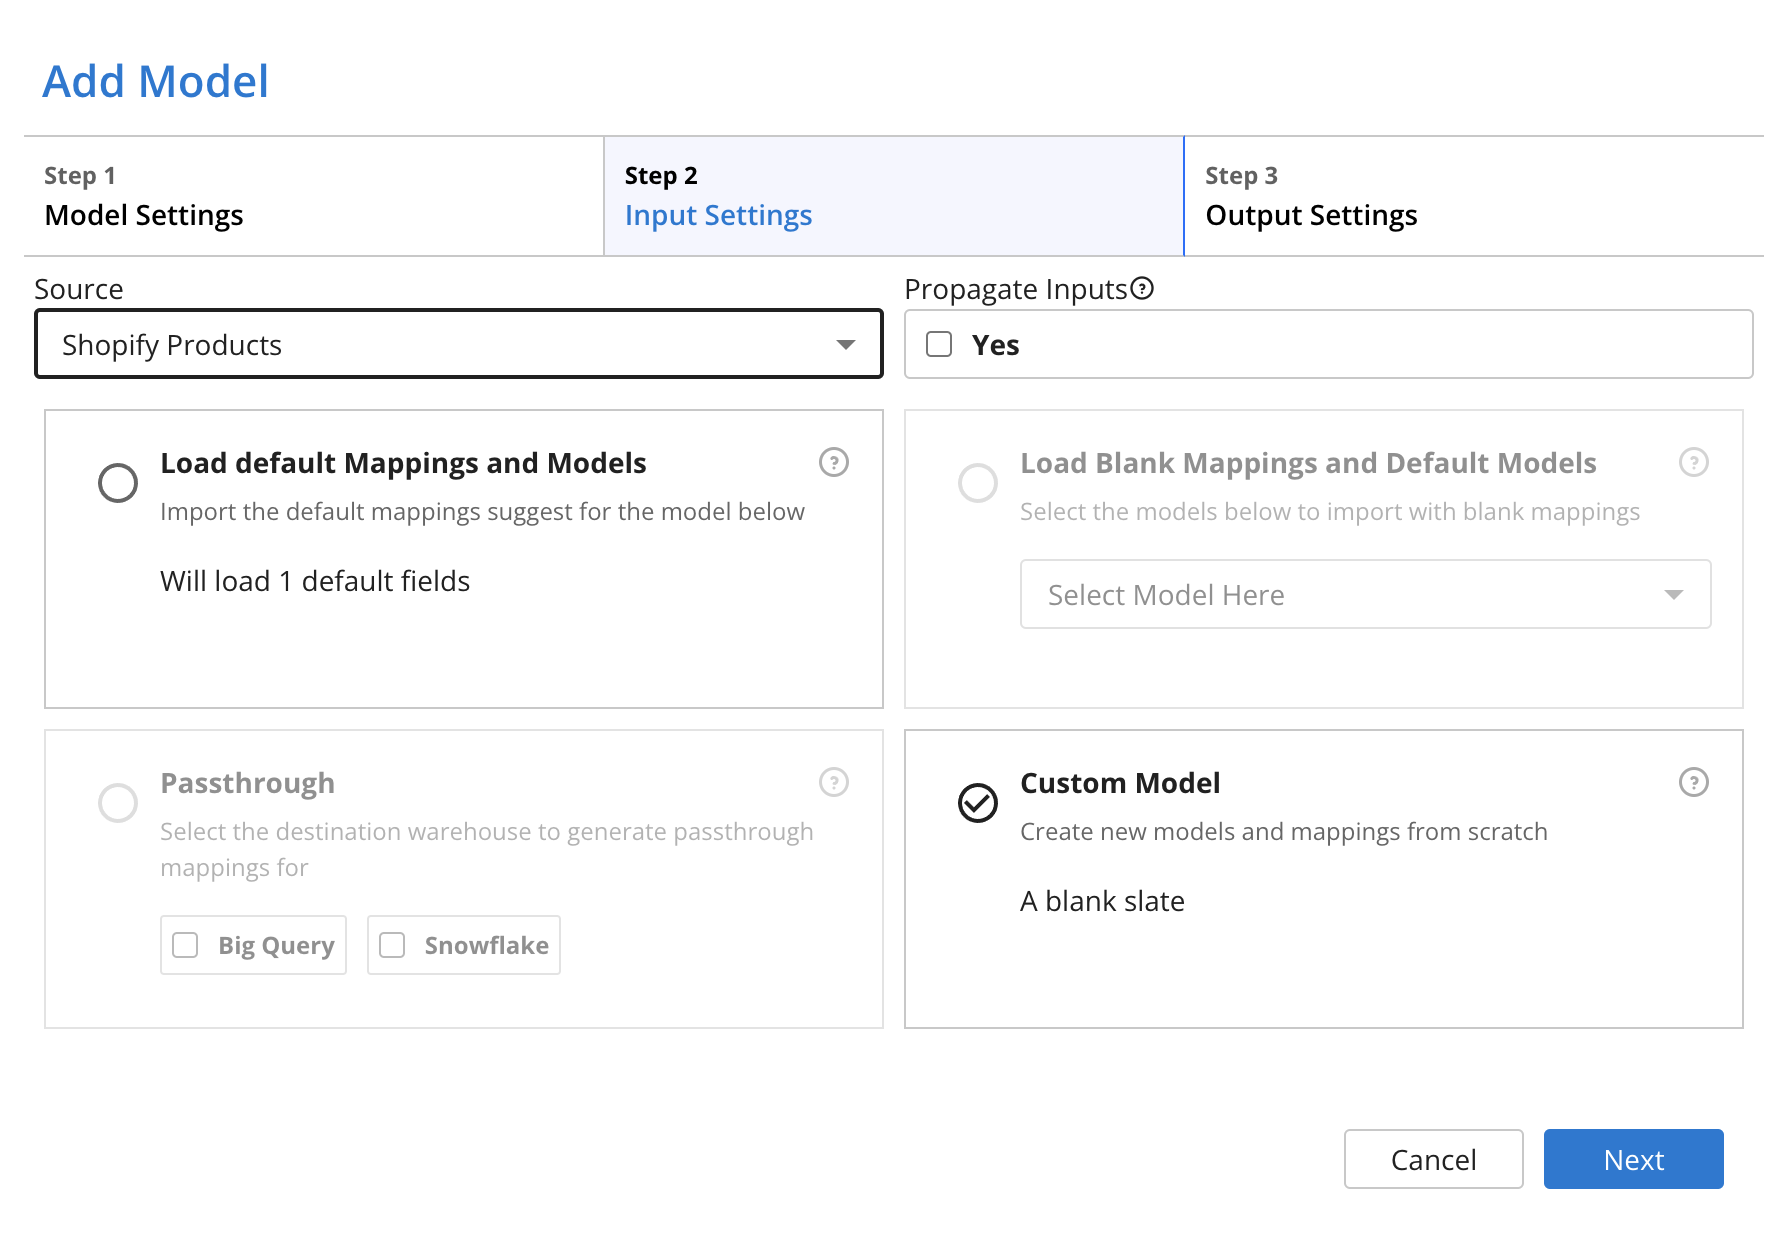
- Select the object or model that inputs to the model you are creating:
- If you select Source in the Model Purpose option on the previous screen, select the source you wish to map from the Source dropdown
- If you select Model in the Model Purpose option on the previous screen, select the model configuration from which you wish to branch in the Model dropdown.
ℹ️ If you want to connect additional models, you can do so after the model is created directly in the Mapping graph. See "Managing Inputs in the Mapping Canvas" to learn more.
ℹ️ Propagating inputs is helpful when an entire source or model object needs to be included in a model's output. This saves time by preventing the need to "remap" data when creating a mapping tree that includes two or more layers of models. See Using the Semantic Layer in Reactor for more information about transforming data using a multiple-model mapping tree.
- (Optional) If you want all data from the input (Source or Model) selected above to output in this model, select the checkbox next to Propagate Inputs.
- Select the type of model to load into the Mapping graph:
- Select Custom Model (the lower right option) to build an entire model from scratch.
- If a default model configuration exists for the input you have selected, select the Load default Mappings and Models option to load and edit that configuration in the Mapping UI.
ℹ️ The capability to load starter models for entities like orders, customers, products, and more is coming soon, keep an eye on our Release Notes page to be the first to know when this feature is released.
-
Select Next to move to the next screen of the setup wizard:
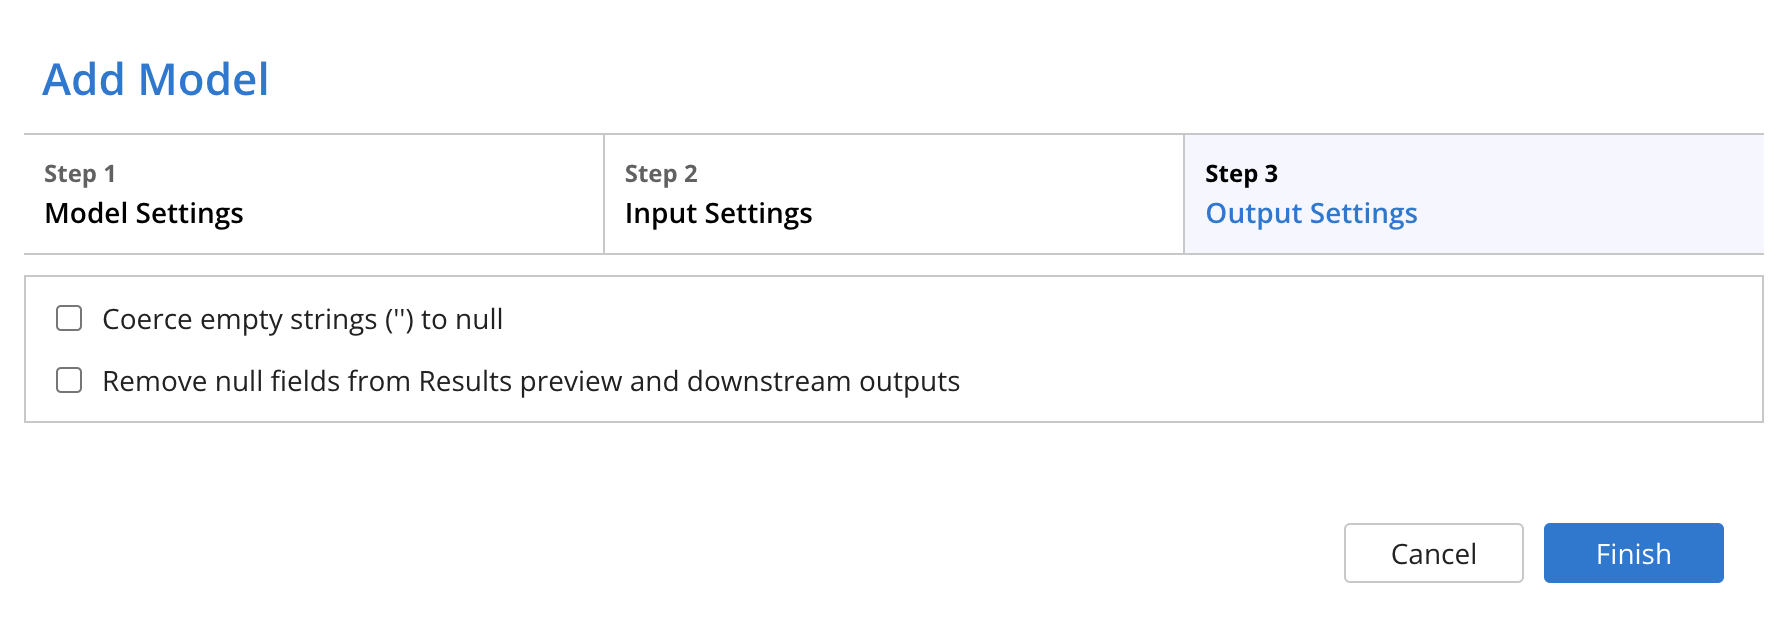
- (Optional) Select the checkbox next to Coerce empty strings ('') to null if you want any mappings that result in an empty string to be converted to a null in the final output.
- (Optional) Select the checkbox next to Remove null fields from Results preview and downstream outputs if you want fields resulting in a null value to be hidden from any results previews and outputs.
- Click Finish to complete the wizard.
- Once you select Finish, you will be directed to the mapping configuration screen for this configuration, where you can create, update, and delete mappings from the configuration.
- For more info on writing mappings in a configuration, see "Writing Mapping Expressions". To learn more about
- Select the Deploy button to deploy your changes if you selected the Load default Mappings and Models option while defining the model's Input settings and want to immediately deploy the default model. See the "Review and Deploy Your Changes" section below to learn more about the deployment step.
- Read on below to learn how to add fields to a mapping configuration.
How to Add and Configure Fields in a Mapping Configuration
In most cases, adding and configuring a mapping takes seconds:
To add a field to a mapping configuration, select the Add Field ➕ button at the top-left of the Model Mappings window, then select a field type from the field type dropdown menu. In mapping configurations, users can configure four types of fields:
-
Single Value
-
Local Variable
-
Object Field
-
Array of Objects
ℹ️ Mapping expressions are applied in order from top to bottom. For this reason, local variables are always pinned to the top of the Model Mappings box.
Read on to learn how more about each field type, including how to configure each field type.
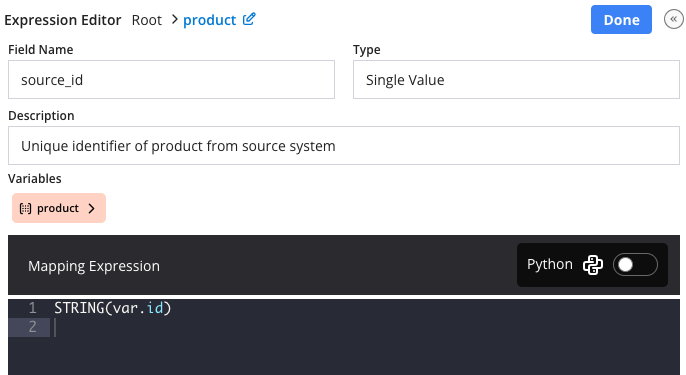
Single Value Fields
A Single Value field is an attribute with one output per mapped record. It is the most common type of field used in mapping, defines a single attribute or field in a mapping output.
To configure a single value field, select the 📝 icon next to the field, then enter the following:
- In the Field Name box, enter the name of the field in the output. This would be the name of a field in a semantic model or a database table, like sku, source_order_id, first_name, etc.
- In the Description box, enter a description of the field that tells other users in your organization what data is stored in it.
- In the Mapping Expression box below the description, write a mapping expression for the field you have created (for more information on writing mapping expressions, consult this article: Writing Mapping Expressions).
When you are finished, select the Done button to return to the Mapping Editor main screen.
Local Variables
A Local Variable is a shortcut that a user can configure, consisting of two parts:
-
The variable name
-
The expression that the variable name represents
Local variables are useful when mapping sources with deeply nested fields. For instance, in Shopify orders, refund line item data is stored in a deeply-nested object: refunds.refund_line_items.line_item. A field in this object (like the sku field) can be referenced in a mapping expression like this: source.refunds.refund_line_items.line_item.sku. Alternatively, we can create a local variable for source.refunds.refund_line_items.line_item (which we will call rli), so that the sku field can be referenced like this instead: rli.sku.
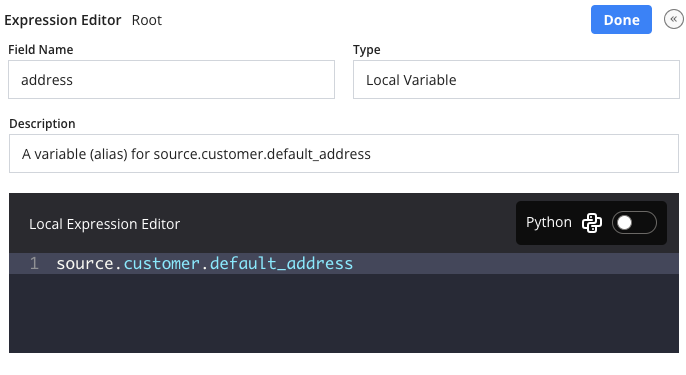
To configure a Local Variable, enter the following information:
-
In the Field Name text box, enter the name of the local variable to use in mapping expressions. In the example above, "address" is the field name.
-
In the Description text box, enter a brief description of the variable so that other users in your organization will understand what it is and why it is used. In the example above, "A variable (alias) for source.customer.default_address", would suffice.
-
In the Local Expression Editor box below the description, write an expression that the local variable represents. In the example above, this would be source.customer.default_address
Object Fields
-
A shipping or billing address in an order
-
A group of customer information (like names, email address, user ID, loyalty ID, etc.) attached to an order
To define an object:
-
Set the name of an object by selecting the 📝 icon next to the field, then enter a name for the object in the Field Name box
-
Select the Done button to return to the main mapping table, then select the ⬇️ icon on the right side of the table next to the object
-
You will be taken to a mapping table for the object:
-
-
Select the ➕ button at the top-right of the screen to add a field to the object, then select the📝 icon next to that field to configure that field
-
At any time, select the ◀️ back button at the top of the object table to return to the main mapping table
-
ℹ️ You can add any type of field within an object, including Single Value fields, Object fields, Arrays, or Local Variables.
Arrays of Objects
An Array of Objects is an object field that is repeatable within a single record. Common examples of Arrays include:
-
Line items in an order
-
Fulfillments in an order
-
Tracking scan data in a shipment
To define an array:
-
Select the 📝 icon next to the field, you will be directed to a new window in the mapping editor
-
Define the name of the array in the Field Name box
-
Define the source iterator for this array. The iterator is an array in the source (for a source mapping configuration) or immediately upstream model (for a model configuration) that the mapper should iterate on while mapping the data. Any array field in the source can be used as an iterator, but you should select the source array that contains relevant data for the array which you are mapping. For example, in the clip below, the user is defining the iterator as the items.items array in the data source (source.items.items).
-
Enter an alias for the array’s source iterator in the Iterator Name box: this is a shortcut to use when mapping fields from the source array to fields within the array you have just created
-
Enter the expression of the source array in the Iterator Value box
-
Select the Done button to return to the main mapping table, then select the ⬇️ icon on the right side of the table next to the array
-
You will be taken to a mapping table for the object:
-
Select the ➕ button at the top-right of the screen to add a field to the object, then select the 📝 icon next to that field to configure that field
-
At any time, select the ◀️ back button at the top of the object table to return to the main mapping table
ℹ️ You can add any type of field within an array of objects, including Single Value fields, Object fields, Arrays, or Local Variables.
How to Edit an Existing Mapping Configuration
To edit any configuration on the graph, simply click the configuration box on the mapping graph.
Alternatively, select the Search box at the top-right of the mapping graph to search for a specific configuration. When you select a result from the search, the Mapping Graph will center on that configuration.
Review and Deploy Your Changes
To deploy changes to a mapping configuration, select the Deploy button at the top-right of the mapping configuration editor. You will receive a confirmation at the bottom of the screen when your changes are deployed.
⚠️ Always remember to Deploy your mapping updates before moving to a different page in the UI! Otherwise, your changes will be discarded, and those changes are not recoverable.
Alternatively, you can save your configuration to the Mapping Sandbox by selecting the Save button. See our article Building, Updating, and Testing Mappings in Sandbox Mode to learn more about the Mapping Sandbox.
What is Next?
After you have completed the mapping process, the last step before data begins being transformed and output to your destination is to create and deploy an output configuration.
See Creating Output Data in the Mapping Canvas to learn how to create, edit, and deploy an output in the Mapping screen.
Additionally, you can add more inputs to your model or update your model's input settings. See Managing Inputs on the Mapping Graph for more information on adding and managing inputs.
If you make updates to a mapping configuration and need to retransform your collected data, you can execute a replay of the data by selecting the 🔃 icon on a data source in the Mapping UI. For more information on retransforming data, see Retransforming Data and Mapper Replay.