
Connect Reactor To Your Data Destination and Define Destination Targets
Destinations · Updated September 25, 2025
Introduction
This document explains how to connect Reactor to your data destination and add and update destination targets in Reactor. It defines destination targets and provides instructions for adding both Data Warehouse Table Targets (for BigQuery or Snowflake) and Object Storage Bucket Targets (for Amazon S3).
Supported Data Destinations
Reactor Data can export data to the following destinations:
- Amazon S3 Cloud Object Storage
- Google BigQuery
- Google Cloud Storage
- Snowflake
Loading Data to Other Data Warehouses via Cloud Storage (S3/GCS)
Reactor's powerful ETL capabilities allow you to export structured data in industry-standard formats directly to Amazon S3 or Google Cloud Storage (GCS) buckets. This mechanism provides a flexible and efficient way to load data into virtually any Data Warehouse (DWH) platform that supports ingesting these file formats from S3 or GCS.
How it works:
-
Configure a Reactor Destination: Within Reactor, set up an S3 or GCS bucket as your data export destination. You'll specify the desired output format for your files.
-
Let Reactor transform and output your Data: As your Reactor streams data from your sources and executes mapper replay jobs, the processed and transformed data will be written directly to the designated S3 or GCS bucket in the chosen structured file format.
-
Ingest into Your DWH: Once the data resides in your cloud storage, your DWH platform can then directly access and load these files. Most modern DWHs offer native connectors or commands to read data from S3 or GCS, allowing you to create external tables or directly ingest the data into your DWH tables. This typically involves specifying the bucket path, file format, and any necessary schema definitions or auto-detection settings within your DWH's interface or SQL commands.
This approach leverages the scalability and cost-effectiveness of cloud object storage for interim data staging, providing a robust and widely compatible method for data loading.
Commonly Used Data Warehouse Systems Supporting this Workflow:
Many DWH platforms are designed to seamlessly integrate with cloud object storage for data ingestion. Beyond BigQuery and Snowflake (which we integrate with directly), some of the most commonly used systems that support loading JSON, Avro, or Parquet files from S3 or GCS include:
-
Databricks (Delta Lake): Databricks, built on Apache Spark, extensively supports reading data from S3 and GCS in JSON, Avro, and Parquet formats. You can use
spark.readcommands or theCOPY INTOcommand to ingest data directly into Delta Lake tables, which are highly optimized for analytical workloads. Databricks' Auto Loader feature is particularly useful for incrementally and efficiently processing new data arriving in cloud storage. -
Amazon Redshift (with Redshift Spectrum): While Redshift is a traditional columnar DWH, Redshift Spectrum allows you to run SQL queries directly against data stored in S3 in various formats, including JSON, Avro, and Parquet, without loading it into Redshift tables first. You can also use the
COPYcommand to load data from S3 into Redshift tables. -
Microsoft SQL Server (via PolyBase or external tables in Azure SQL Database/Synapse Analytics): Modern versions of MS SQL Server, especially within Azure SQL Database and Azure Synapse Analytics, offer capabilities like PolyBase to connect to external data sources, including Azure Blob Storage (equivalent to S3/GCS for this purpose), and query data in formats like Parquet and CSV. For JSON, you can often load it as a string and then parse it within SQL Server.
-
Apache Hive / Presto / Trino (via Hadoop-compatible file systems): For on-premise or self-managed data lake architectures, systems like Apache Hive, Presto, and Trino (often used with a Hive Metastore) can directly read and query JSON, Avro, and Parquet files stored in S3 or GCS, as these cloud storage services are compatible with Hadoop file system APIs.
-
StarRocks: This new generation of MPP database supports external table features allowing users to query data from S3 or GCS in formats like Parquet, ORC, and Avro.
This "load from cloud storage" approach provides significant flexibility, allowing you to connect Reactor with a wide array of data analytics and warehousing solutions.
How to Connect Your Data Destination In Reactor
Amazon S3 Cloud Object Storage
Before You Get Started
To integrate Reactor with S3, you will need:
- An S3 Account
- The name of the S3 bucket to which you want to load data
- Your AWS Account ID (The AWS account ID is displayed when you go to the IAM Dashboard in the AWS account section)
- Your account's host region (e.g.,
us-east-1)
Connection Instructions
-
In Reactor, select the Destinations link on the left sidebar
-
Select the Add new Destination connection button at the bottom of the left sidebar to begin the setup wizard
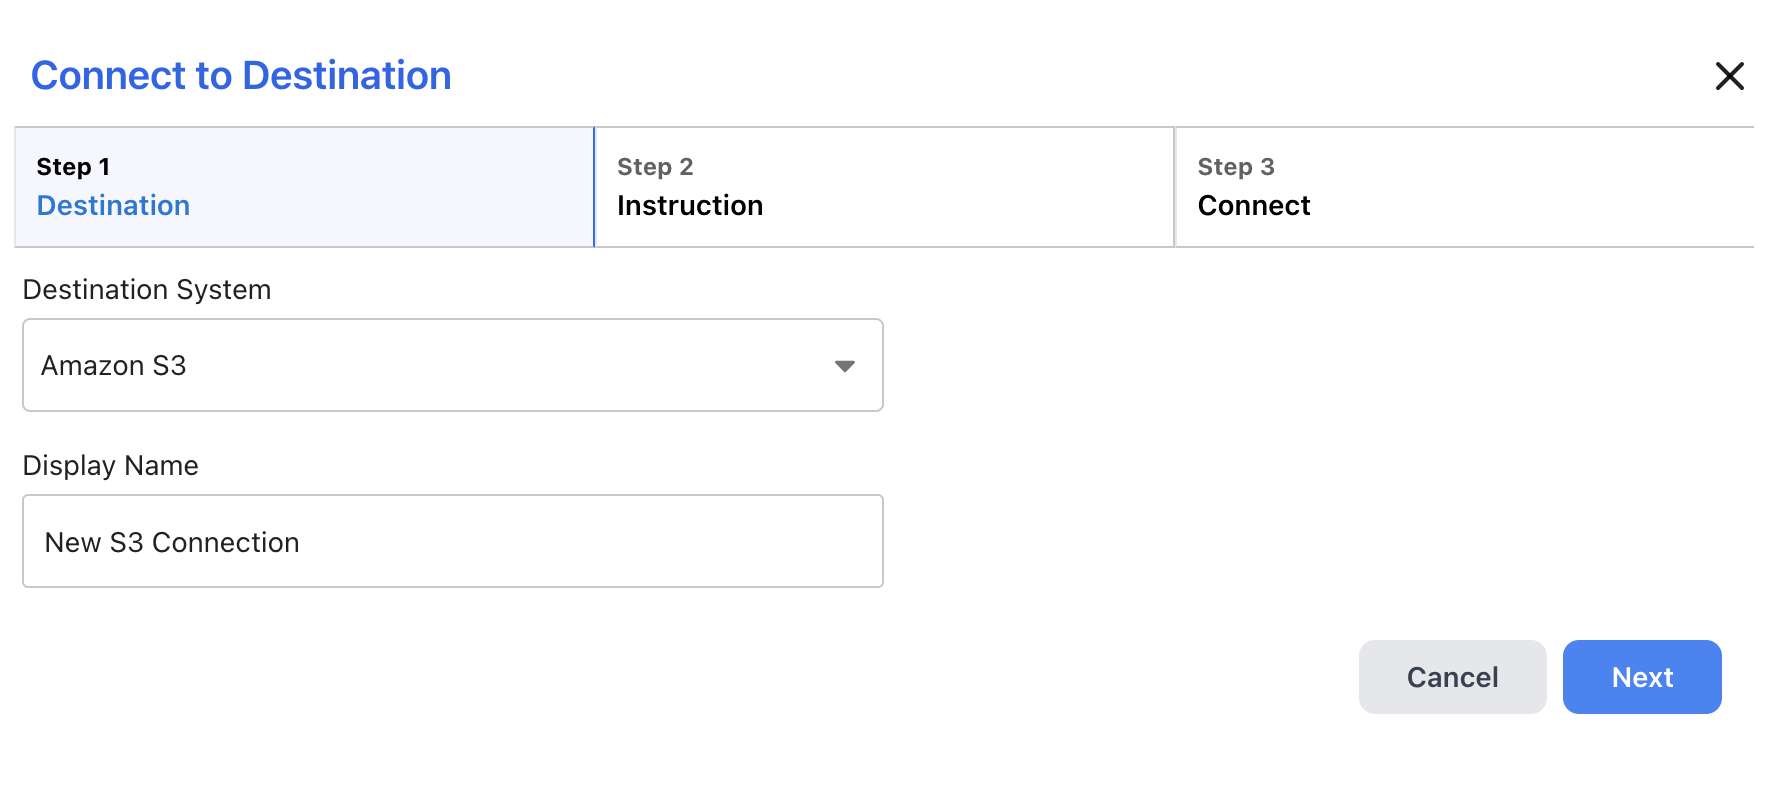
- Select the Amazon S3 tile at the top of the setup wizard and enter a display name for your connection, then select Next to move to the next step
- Select the type of credentials you would like to use to authenticate with S3:
- Select "Use Key Pair" if you want to set up a SSH key pair to use for authentication with Reactor.
- Select "Use Temporary AWS Security Credential" if you want to authenticate via an IAM role and policy grant in AWS.
After you make your selection, Reactor will display instructions for configuring permissions in AWS. Those instructions are also printed below (under Enabling Reactor Access). Complete the instructions in a separate browser tab, then select the Next button to move to the next step of the setup wizard.
- Enter the final connection configuration parameters in the wizard:
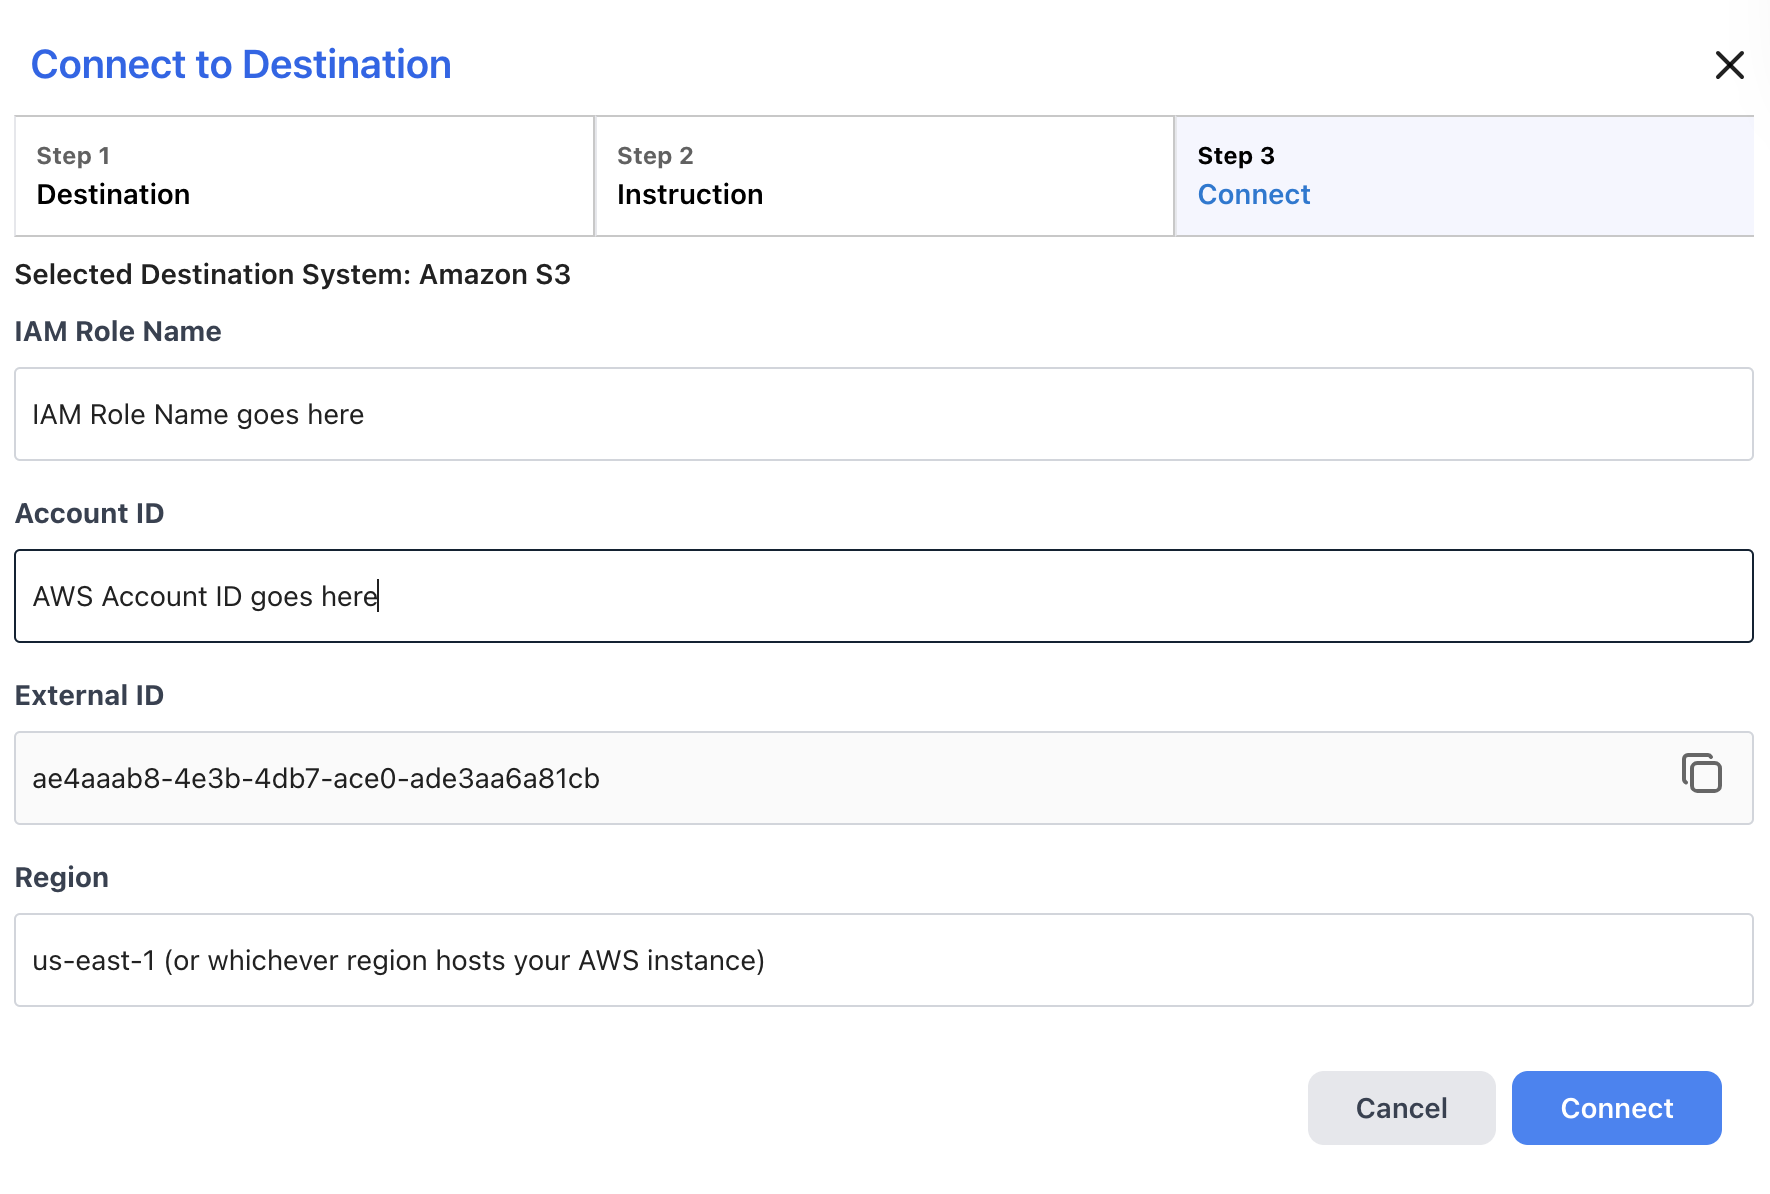
- If you selected "Use Temporary AWS Security Credential" for authentication:
- Enter the name of the IAM Role you created for Reactor in the IAM Role Name box.
- Enter your AWS Account ID in the Account ID box.
- An external ID generated by Reactor to use in your S3 security policy is displayed in the External ID box. You cannot edit this, but you can copy it for your records.
- Enter the region where your S3 bucket is hosted in the Region box.
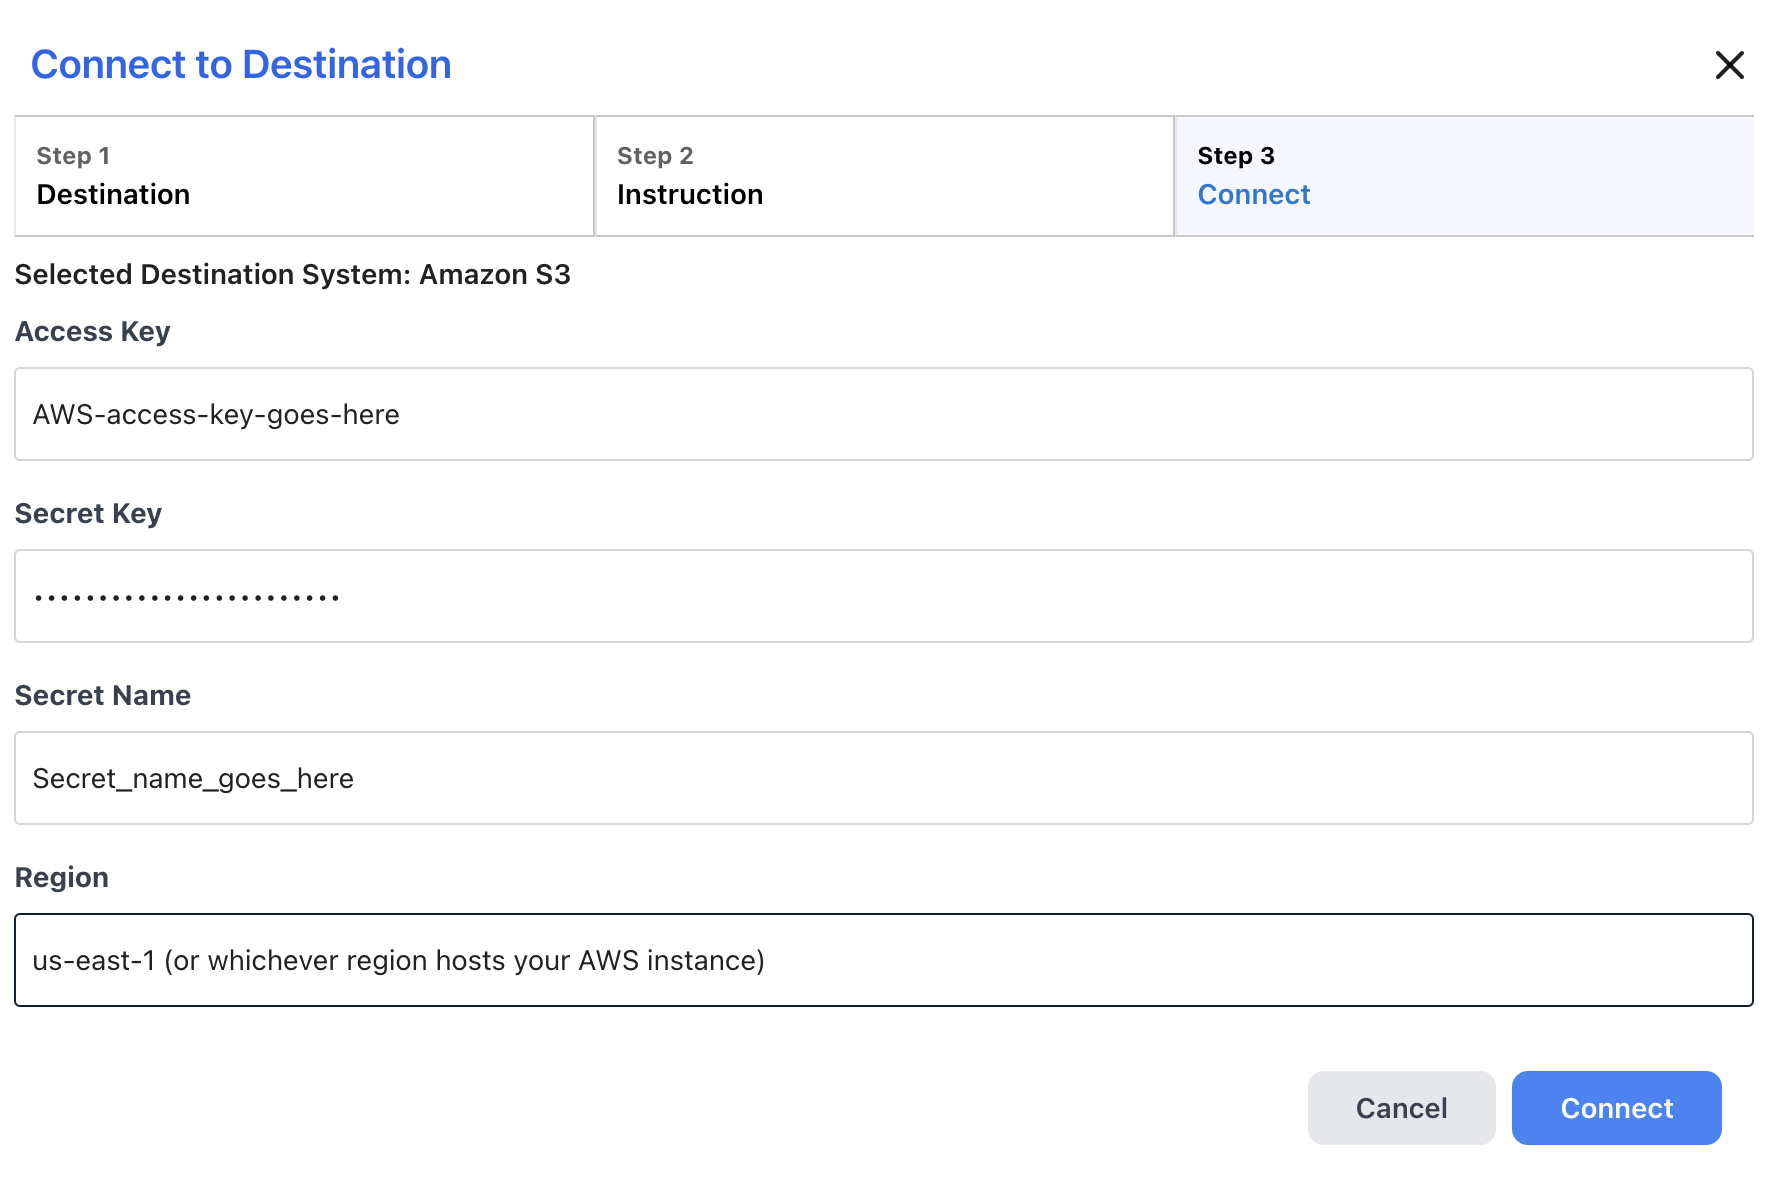
- If you selected "Use Key Pair" for authentication:
- Enter the AWS access key created when you set up your S3 environment for Reactor in the Access Key box.
- Enter the AWS secret key created when you set up your S3 environment for Reactor in the Secret Key box.
- Enter a text string containing only letters, spaces, and/or underscores (_) in the Secret Name field.
- Enter the region where your S3 bucket is hosted in the Region box.
- Select Connect to complete the setup process and close the wizard.
- If you selected "Use Temporary AWS Security Credential" for authentication:
Once you have completed the setup process and connected to your S3 bucket, you may start adding bucket targets, which are detailed below.
Enabling Reactor Access
When configuring an Amazon S3 connection, you will be prompted to select an authentication type in Step 2 of the setup wizard.
- Use a Temporary AWS Security Credential if you want to authenticate via an IAM role and policy grant in AWS.
- Use a Key Pair if you want to set up a SSH key pair to use for authentication with Reactor.
Below are the instructions to configure authentication in AWS for each authentication type. It is recommended to complete these steps in a separate browser tab, so you do not lose your setup progress in Reactor.
- If you select "Use Temporary AWS Security Credential" for authentication:
- Create an IAM Policy for your S3 Bucket (the bucket policy will be applied to the role created in the next step).
- Go to the IAM console in AWS.
- In the navigation pane of the IAM console, choose Policies, then create a new Policy.
-
Paste the JSON below into the policy editor and replace
BUCKET_NAMEwith the name of your bucket. -
{ "Statement": [ { "Action": [ "s3:PutObject", "s3:GetObject", "s3:ListBucket", "s3:DeleteObject" ], "Effect": "Allow", "Resource": [ "arn:aws:s3:::BUCKET_NAME", "arn:aws:s3:::BUCKET_NAME/*" ], "Sid": "ReactorObjectAccess" }, { "Action": "s3:ListAllMyBuckets", "Effect": "Allow", "Resource": "*", "Sid": "ReactorListAccess" } ], "Version": "2012-10-17" } - Click Next and review the policy details, giving it a descriptive name like
Reactor-Data-S3-Access.
- Create an IAM Role for Reactor to assume.
- In the IAM console in AWS, select Roles, then select Create Role.
- Select the Custom Trust Policy option.
- Paste in a JSON statement supplied in the setup wizard. ⚠️ DO NOT CHANGE the
ExternalIdvalue, this is a unique, Reactor-supplied role name for exclusive use with your Account ID. - On the next screen, assign the role to the Policy you created in the previous step.
- Take note of the name you gave to this role. You will need to provide Reactor with the name of this role along with your account's ID and host region.
- Create an IAM Policy for your S3 Bucket (the bucket policy will be applied to the role created in the next step).
- If you select "Use Key Pair" for authentication:
- Create an IAM User for Reactor:
- Navigate to the IAM console in AWS (link).
- Create a new IAM user in the AWS Management Console. The user name must not contain any spaces. Name the user something easy for other users in your organization to understand, like “ReactorExporter.”
- Create Access Keys for your user
- In the navigation pane of the IAM console, choose Users.
- Choose the user name of the user created in the step above to go to the user’s details page.
- On the Security credentials tab (in the Access keys section), choose Create access key.
- On the Access key best practices & alternatives screen, select Other and then choose Next.
- (Optional) On the Set description tag page, you can add a description tag to the access key to help track your access key.
- Select Create access key.
- On the Retrieve access key page, choose Show to reveal the value of your user's secret access key.
- Choose the Download .csv file button to save the access key ID and secret access key to a .csv file in a secure location on your computer. You will need these keys when deploying your S3 destination in Reactor
⚠️ This is the only time you can view or download the newly created access key, and you cannot recover it. Make sure you securely store your access key.
- Create and Apply a Bucket Policy Grant to the Reactor IAM User
- In the navigation pane of the IAM console, choose Users.
- Select the user created in step 1 (above)
- In the Permissions tab, select Create policy.
- Paste the JSON below into the policy editor and replace BUCKET_NAME with the name of your bucket. If you want to grant access to multiple buckets, repeat the ARN lines in the Resource array of the JSON and list the additional buckets, separated by commas.
- Click Next and review the policy details, giving it a descriptive name like Reactor-S3-Access.
- Attach the policy to the IAM user created in step 1 (above) by selecting it from the list.
- Verify that the policy is listed in the Permissions tab for that user.
- Create an IAM User for Reactor:
{
     "Version": "2012-10-17",
     "Statement": [
          {
               "Sid": "ReactorObjectAccess",
               "Effect": "Allow",
               "Action": [
                    "s3:PutObject",
                    "s3:GetObject",
                    "s3:ListBucket",
                    "s3:DeleteObject"
               ],
               "Resource": [
                    "arn:aws:s3:::BUCKET_NAME/*",
                    "arn:aws:s3:::BUCKET_NAME"
               ]
          },
          {
               "Sid": "ReactorListAccess",
               "Effect": "Allow",
               "Action": "s3:ListAllMyBuckets",
               "Resource": "*"
          }
    ]
}
Regardless of which authentication option you are using, when you have completed the setup steps in AWS, you can return to the Reactor browser tab, select Next, and proceed to the final step in the setup wizard. Full step-by-step instructions can be found above.
Google BigQuery
Before You Get Started
To integrate Reactor with Google BigQuery, you will need:
- A BigQuery Account
- The name(s) of the BigQuery project(s) to which you want to load data
Connection Instructions
-
In Reactor, select the Destinations link on the left sidebar
-
Select the Add new Destination connection button at the bottom of the left sidebar to begin the setup wizard
-
Select the BigQuery tile at the top of the setup wizard
-
Enter the connection configuration parameters in the wizard:
-
Enter a display name in the Display Name box
-
Enter the name of your BigQuery project in the Project box
-
Enter the name of the Dataset to which you would Reactor like to export data in the Dataset box
-
The Use default Credentials option is preselected in the Credentials Type box, do not change this
-
Select the Connect button to complete the connection
-
-
Select Connect to complete the wizard
Enabling Reactor Access
Reach out to the Reactor team (support@reactordata.com) to request a Google service account ID for your BigQuery connection. You will need to provide this service account the following permissions in your BigQuery project:
- BigQuery Data Editor (roles/bigquery.dataEditor)
Snowflake
Before You Get Started
To integrate Reactor with Snowflake, you will need:
-
A Snowflake account
-
Your Snowflake account name
-
Your Snowflake instance URL
- The names of your Snowflake Warehouse and Database
Read on for instructions on retrieving your Snowflake account name, URL, Warehouse name, and Database name
How to Find Your Snowflake Account Name
To find and copy your Snowflake Account Name and Instance URL, do the following:
- Log into your Snowflake account (login link)
-
Click on the account selector tile at the bottom of the left sidebar to review your Snowflake accounts
-
Select the account you want to connect to Reactor
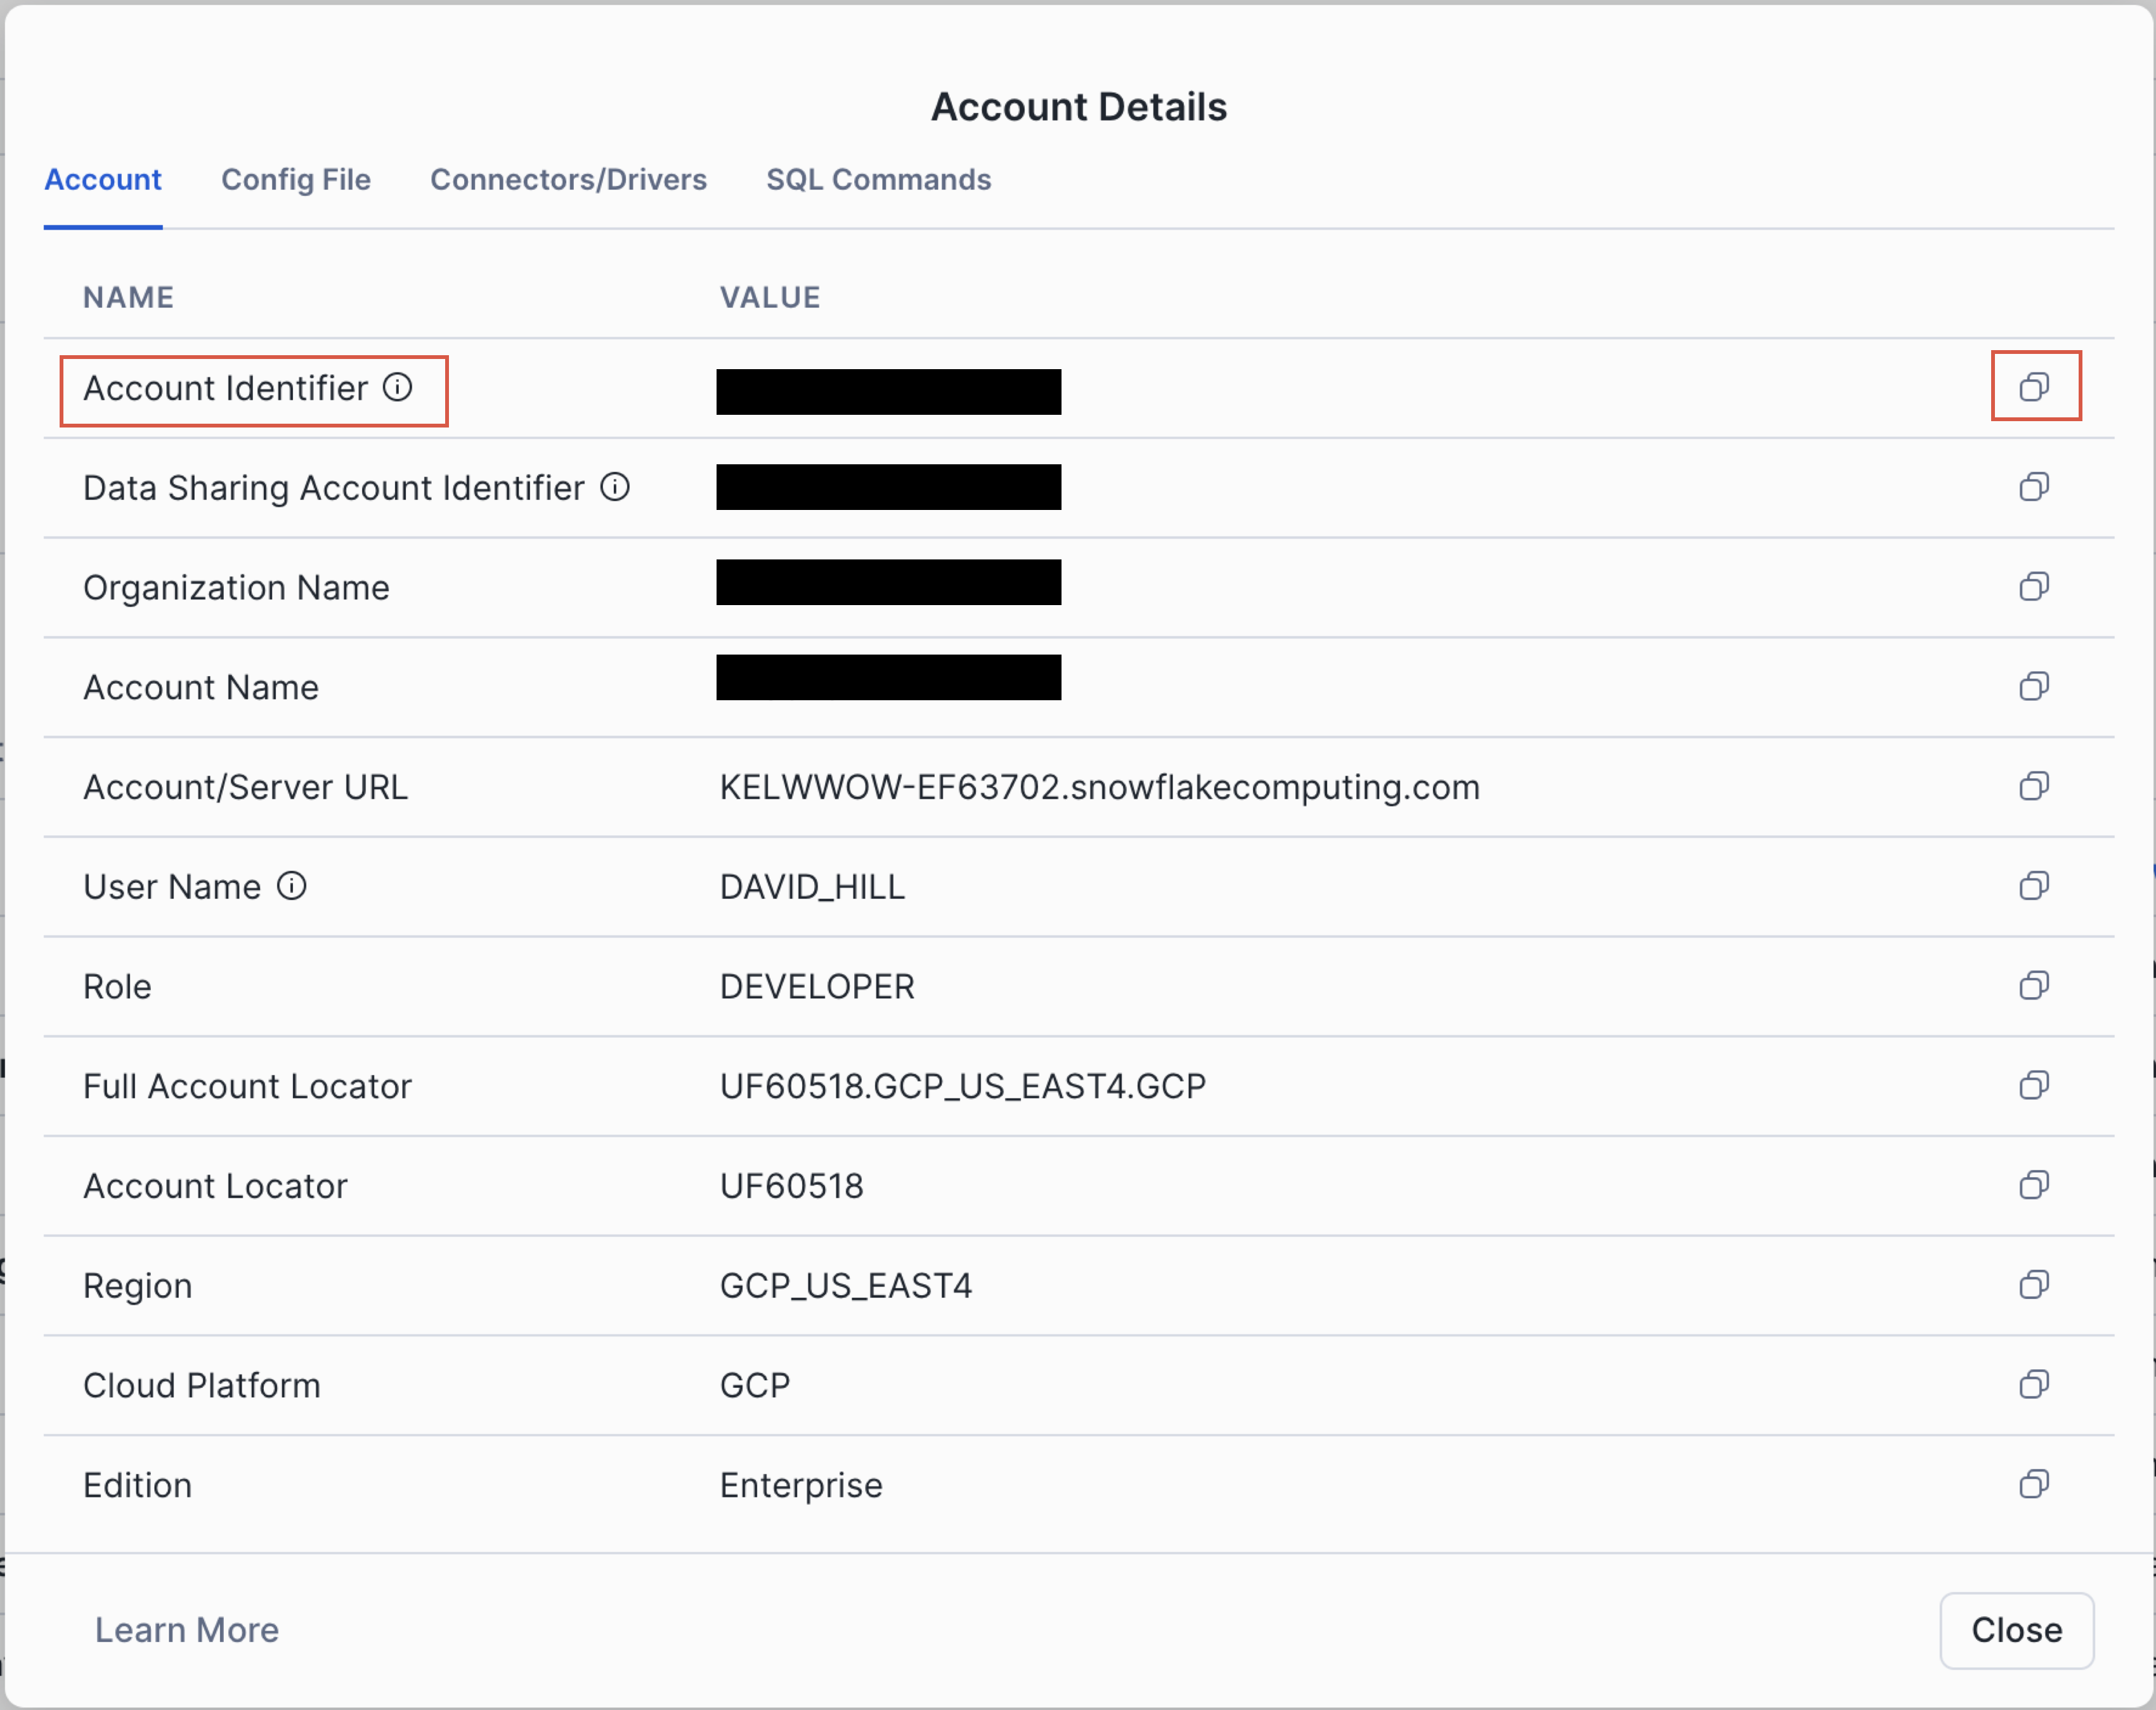
- Select the View account details link
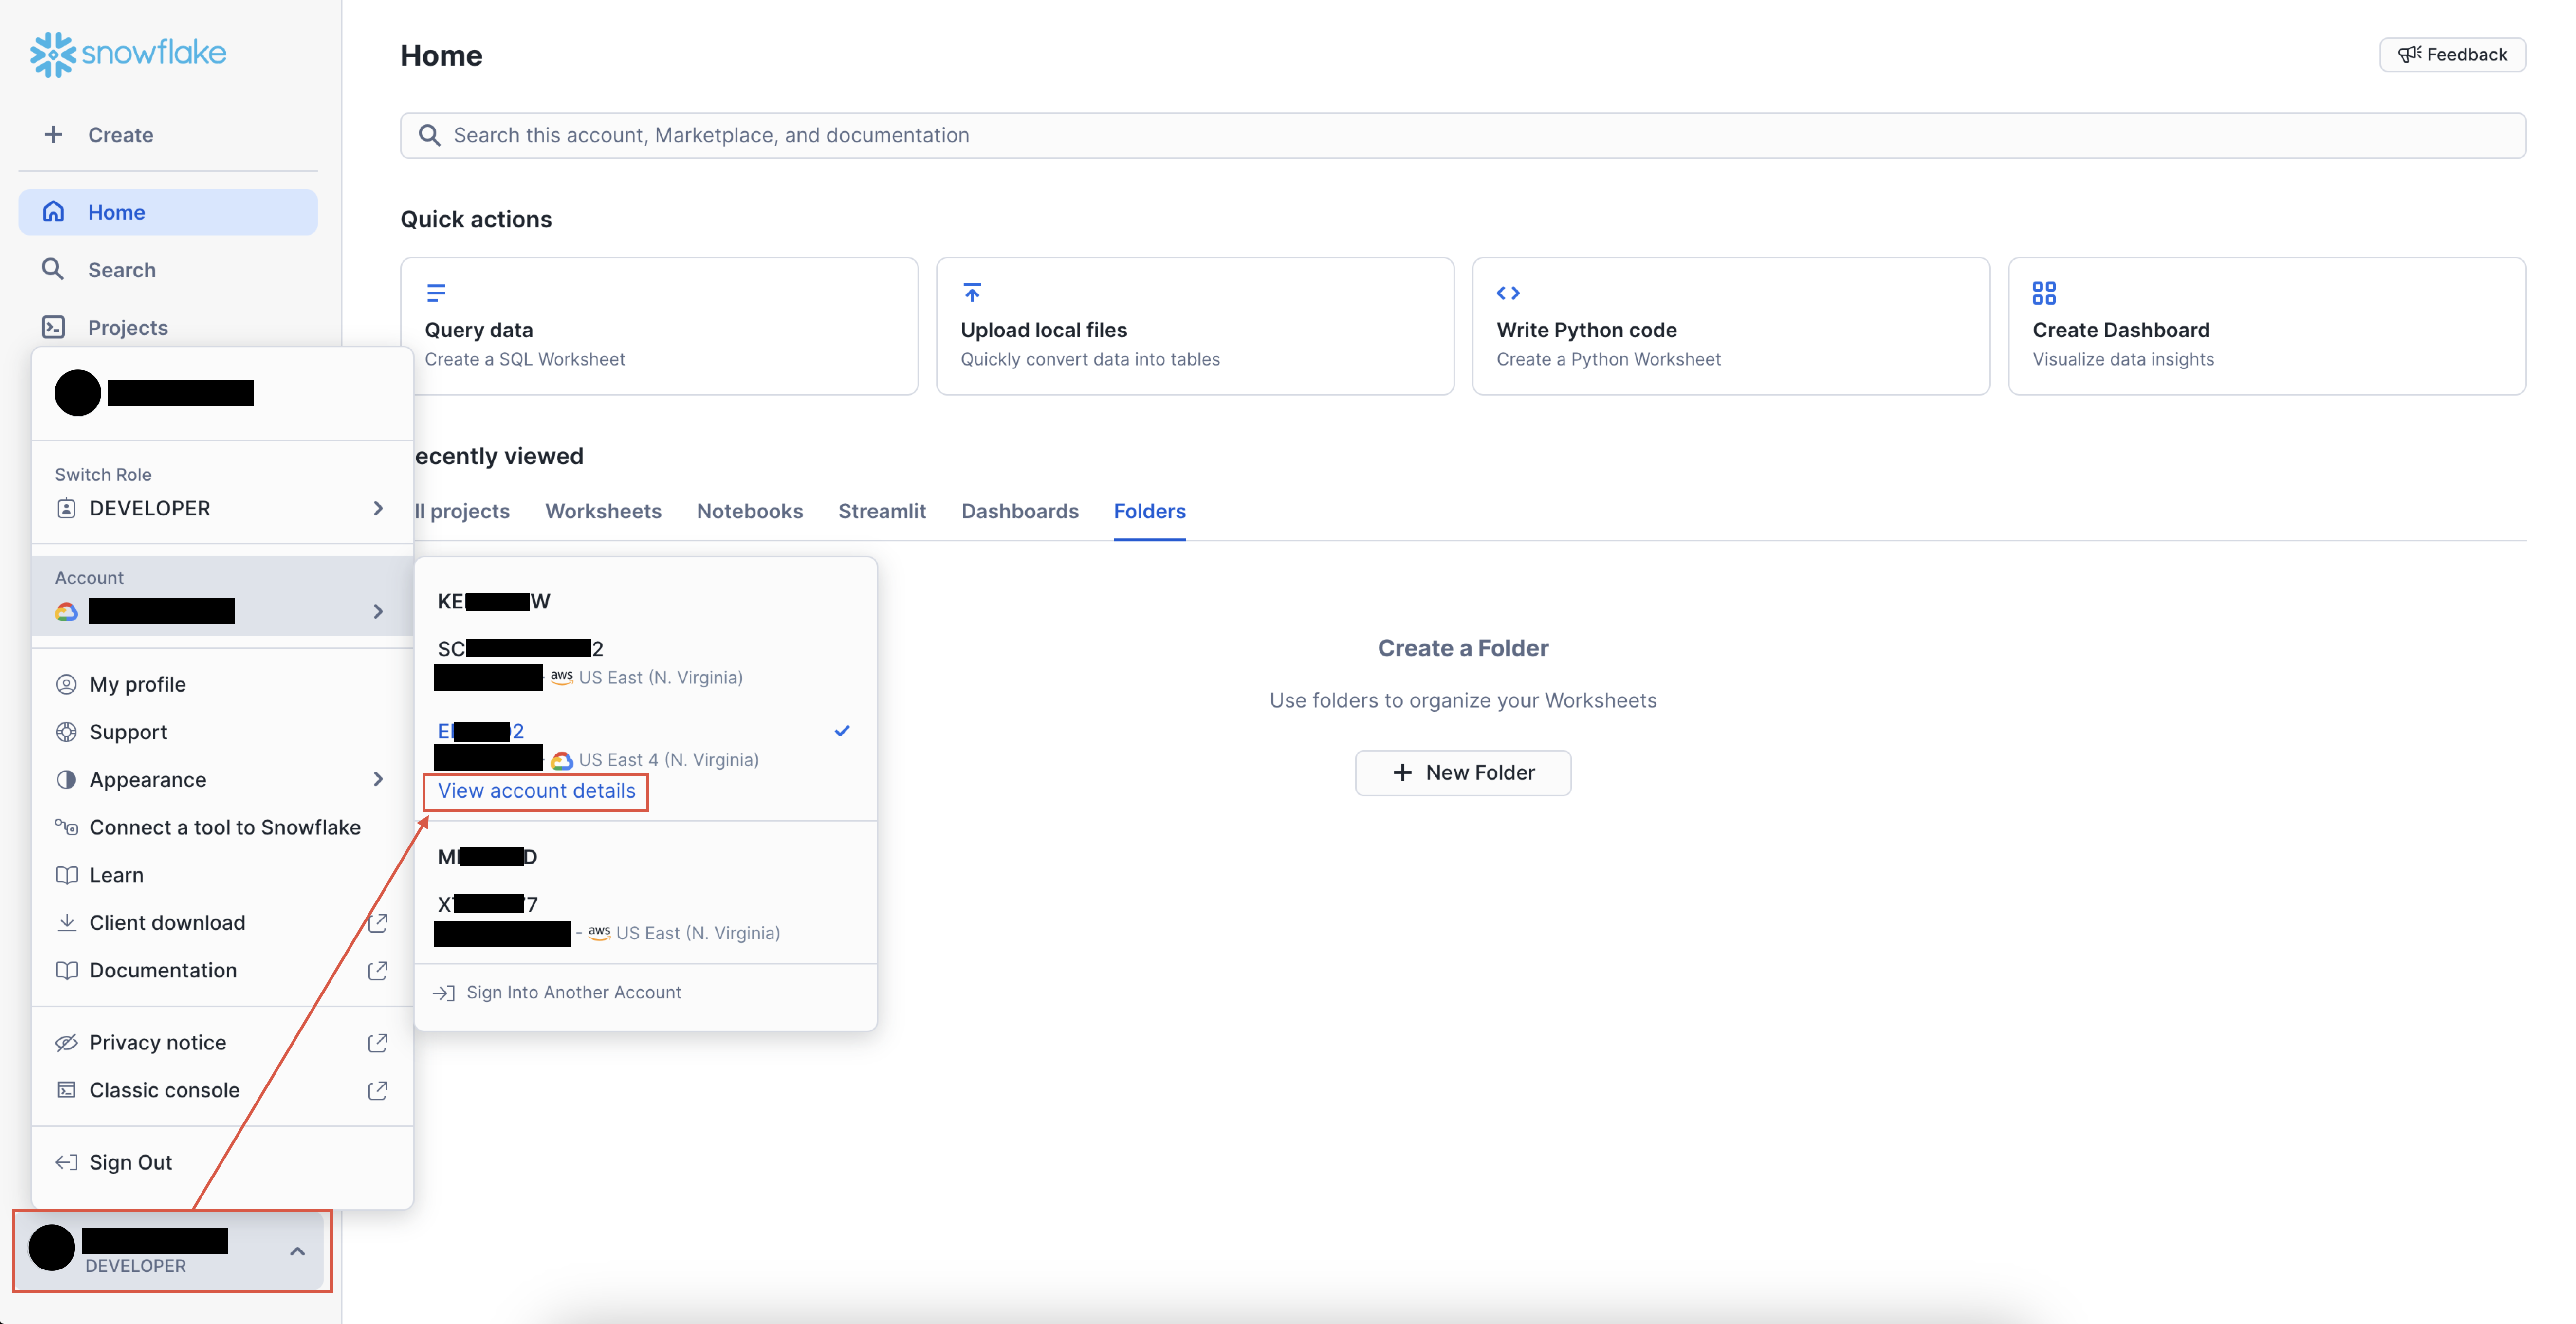
- A list of account details will be displayed; select the copy icon (🔲) next to Account Identifier to copy your account name
How to Find Your Snowflake Account URL
⚠️ The URL needed to connect to your Snowflake database from Reactor is not the same as the Account/Server URL shown in the screenshot above.
In a Snowflake query window, execute the following query (note: only a user with the ACCOUNTADMIN role can execute this query):
SELECT
  DISTINCT ORGANIZATION_NAME, ACCOUNT_NAME, ACCOUNT_LOCATOR
  , CONCAT(ORGANIZATION_NAME,'-',ACCOUNT_NAME) AS ACCOUNT_IDENTIFIER
  , CONCAT('https://',LOWER(ACCOUNT_LOCATOR),'.',LOWER(CONCAT(SPLIT_PART(REGION,'_',2),'-',SPLIT_PART(REGION,'_',3))),LOWER('.snowflakecomputing.com:443')) as URL
FROM SNOWFLAKE.ORGANIZATION_USAGE.RATE_SHEET_DAILY
Review the query results. Copy the URL value from the row with the ACCOUNT_LOCATOR value that matches the Account Identifier found in the Snowflake account details screen (see above). The URL should look like this:
https://#######.{hostRegion}[.{hostPlatform}].snowflakecomputing.com:443
e.g., https://abc12345.us-east-1.snowflakecomputing.com:443
How to Find Your Snowflake Warehouse Name
In a Snowflake query window, execute the following script:
SHOW WAREHOUSES
The script will return a list of your account's warehouses, with the warehouse name in the name column.
How to Find Your Snowflake Database Name
ℹ️ We recommend creating a new database for your Reactor data and naming the database "YOURBUSINESSNAME_REACTOR" with your business name in place of "YOURBUSINESSNAME" (e.g., "ACME_REACTOR"). This ensures that no other processes can land data in the database used with Reactor.
To find your database names, execute the following script in a Snowflake query window:
SHOW DATABASES
The script will return a list of your account's databases, with the database name in the name column.
Connection Instructions
⚠️ Snowflake configuration parameters are case-sensitive, take care when entering configuration parameters in the Destination connection setup wizard.
- In Reactor, select the Destinations link on the left sidebar
-
Select the Add new Destination connection button at the bottom of the left sidebar to begin the setup wizard
- Select the Destination system:
-
Select Snowflake from the Destination System dropdown menu
-
Enter a display name in the Display Name box
- Select the Next button to proceed to the next step
-
-
Configure the Snowflake configuration parameters:
- Enter your Snowflake account’s name in the Account box
ℹ️ How to Find Your Snowflake Account Name - Enter your Snowflake account URL in the Account URL box.
ℹ️ How to Find Your Snowflake Account URL
The URL you enter should look like this:
https://#######.{hostRegion}[.{hostPlatform}].snowflakecomputing.com:443
e.g., https://abc12345.us-east-1.snowflakecomputing.com:443 -
Enter the name of the Snowflake Warehouse to which you want to export data in the Warehouse box
- Enter the name of the Snowflake Database to which you want to export data in the Database box
- OPTIONAL: Edit the values in the Username and Role boxes if you wish to use a specific role and user for loading data to Reactor. By default, these boxes are populated with "REACTOR_DATA_USER" and "REACTOR_DATA_IMPORTER," respectively. We recommend using these values, so that it is clear which user and role in your Snowflake environment are tied to Reactor.
- OPTIONAL: Enter the name of the schema that houses the landing tables for your Reactor data in the Schema box.
ℹ️ This field is optional, and may be left blank if you want to land data from Reactor into multiple Schemas - In the Credentials Type dropdown menu, select Use Key Pair
-
Enter a text string containing only letters, spaces, and/or underscores (_) in the Secret Name field
- Enter your Snowflake account’s name in the Account box
-
Select Connect to complete the wizard
- On the next screen, you will be shown a script that will give Reactor the permissions it needs to read and insert tables to your Snowflake database and read table schemas from your Snowflake database.
- Copy the script by selecting the Copy to clipboard button
- In a separate browser tab, open a new SQL worksheet in Snowflake and paste the script in the worksheet
- Execute the script by selecting the ▶️ > "Run All" button (or use the shortcut Cmd + Shift + Enter)
⚠️ The Snowflake ACCOUNTADMIN role is required to execute this script.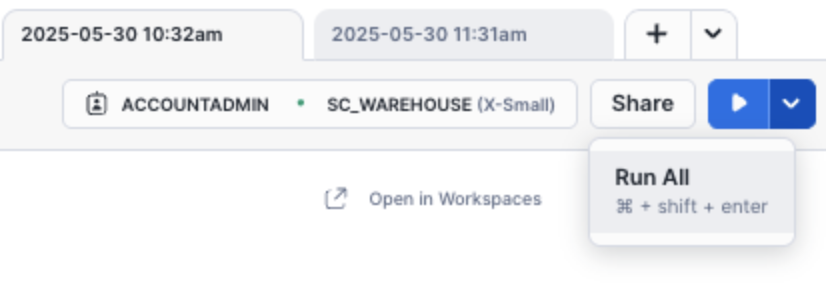
- Once the script has been executed, return to the Reactor browser tab and select the Done button
Once you have followed these steps, you can confirm that your Snowflake connection is fully provisioned by selecting the Test Connection button on the Connection details screen:
After connecting your Snowflake instance to Reactor, you can begin defining which landing tables should be added as destination targets.
How To Add and Update Destination Targets in Reactor
What Are Destination Targets?
Destination Targets are objects within a connected destination where Reactor Data can output and export data. The specific definition of a destination target varies depending on the destination system:
- Data Warehouse systems (e.g., Google BigQuery, Snowflake): A target is a database table. For these systems, targets are labeled "Table Targets" in Reactor.
- Object Storage systems (e.g., Amazon S3): A target is a folder within the object storage bucket (also referred to as a "prefix" in these systems). For these systems, targets are labeled "Bucket Targets" in Reactor.
Adding Table Targets (BigQuery or Snowflake)
-
In Reactor, select the Destinations link on the left sidebar
-
Select the Data Warehouse Connection whose table you wish to add as a Table Target on the side menu
-
(Optional): To limit the list of tables shown in the next step, enter a value in the Default Database (optional) field in the Edit Connection menu, then select Save. If no value is present in this field, Reactor will return all database tables that exist in your connected data warehouse (regardless of the Schema where they are organized).
-
Select the Create Table Target button to retrieve a table schema
-
Enter a display name for this table target: this is how the table will be labeled in the Mappings UI and Add Output dialog
-
Select the table you would like to add from the dropdown menu
-
Select the Save button to complete the wizard
Adding Bucket Targets (S3)
-
In Reactor, select the Destinations link on the left sidebar
-
Select the S3 Connection whose bucket prefix you wish to add as a Bucket Target on the side menu
- Select the Create Bucket Target button to open the setup wizard
- In the wizard, configure the following parameters:
- Enter a display name for this target in the Display Name field
- Enter the name of your S3 bucket in the Bucket Name field
- Enter the prefix you wish to add as a target in the Prefix field
- Select the file type you wish to export to the prefix in the dropdown menu at the bottom of the wizard (supported file formats are: JSON, CSV, parquet)
- Select the Save button to complete the wizard
What is Next?
After you have configured your data destination(s) and added target(s) to Reactor, you can deploy your targets as outputs in Reactor's Mapping interface. See How to Output Data in Reactor for more information on adding, editing, and deploying outputs.